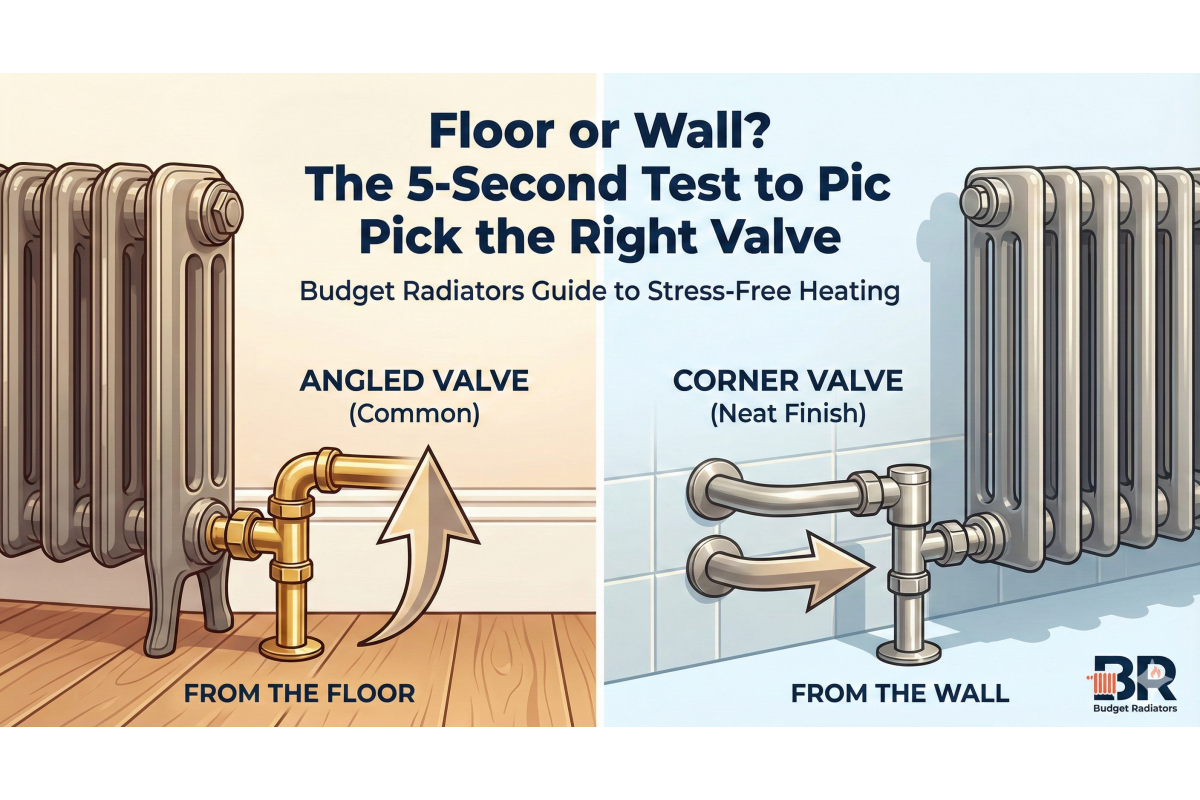
Floor or Wall? The 5-Second Test to Pick the Right Valve
Are you staring at your new radiator and wondering, "Which valve do I actually need?" You aren't alone. It’s the number one question we get asked, but the answer is actually really simple. You don't need to be a plumber to figure it out you just need to look at where your water pipes are coming from. Are they popping up from the floor? Or are they coming out of the wall? That’s it! Once you know that, picking between "Angled," "Straight," or "Corner" valves takes about five seconds. Let’s match you up with the right one so you can get your heating sorted without the headache.
The confusion often stems from the sheer variety of options available. When you browse a heating catalogue, you are bombarded with terms like thermostatic,lockshield, bi-directional, and H-block. It is easy to feel overwhelmed, assuming that you need technical diagrams or a degree in fluid dynamics to make the right choice. However, the decision is largely dictated by the physical architecture of your room. Before you even look at the style or finish, the geometry of your pipework makes 90% of the decision for you.
Once you understand the layout of your pipes, the rest is simply a matter of style and efficiency. The humble radiator valves are often the unsung heroes of your central heating system, responsible not just for connecting the unit to the boiler but for regulating the temperature of your home and keeping your energy bills in check. Choosing the wrong one isn't just an aesthetic mismatch; it can lead to awkward pipework bends, restricted water flow, and inefficient heating.
The 5-Second Test: Visualizing Your Setup
To perform the test, simply stand in front of where your radiator is (or will be) installed. Look at the copper or plastic pipes. This quick observation is the most critical step in your purchasing journey.
- Pipes from the Floor: If your pipes rise vertically from the floorboards, you are in the majority of UK homes. This is the standard configuration for suspended timber floors.
- Pipes from the Wall: If your pipes emerge horizontally from the plasterwork behind the radiator, you likely have a more modern "chased in" setup or a solid floor where pipes couldn't be buried.
- Pipes Along the Wall: In some older properties, pipes run along the surface of the skirting board, exposed to the room.
Your valve choice depends on how these pipes connect to the radiator inlets. Most modern radiators have inlets on the side at the bottom, known as Bottom Opposite End (BOE) connections. By cross-referencing your pipe origin with the inlet position, the answer becomes clear.
Scenario A: Floor Pipes + Side Inlets = Angled Valves
This is the most common setup in the UK. You need a valve that creates a 90-degree turn to connect the vertical pipe coming from the floor to the horizontal inlet on the side of the radiator. An Angled Valve is the perfect solution. It sits on top of the copper pipe, and the threaded tail screws horizontally into the radiator.
Scenario B: Floor Pipes + Underneath Inlets = Straight Valves
If you are installing a traditional heated towel rail or a specific type of cast iron radiator, the inlets might be located underneath the unit, pointing towards the floor. In this case, the water flows in a straight vertical line from the floor into the bottom of the radiator. You need a Straight Valve. Using an angled valve here would look clumsy and require bending the pipe, which is a recipe for leaks.
Scenario C: Wall Pipes + Side Inlets = Corner Valves
This is where many people make a mistake. Technically, you can use an Angled valve here. However, because of the 90-degree bend, the valve head (the bit you turn) will end up pointing straight out into the room. In a tight hallway or a small bathroom, this protruding valve becomes a shin-bumping hazard.
This is where Corner Valves (sometimes called "Double Angled" valves) shine. They are engineered specifically for wall-fed pipes. They turn the 90-degree bend inwards, allowing the valve head to sit parallel to the wall, tucked neatly beside the radiator. This reduces the "projection" of the radiator, saving valuable floor space and creating a much cleaner, designer finish.
Manual vs. Thermostatic: The Efficiency Question
Once you have the shape nailed down, the next question is control. Do you want a simple on/off tap, or an intelligent temperature guardian? This choice defines how you interact with your heating system daily.
Manual Radiator Valves: The Analog Approach
Manual Valves function exactly like a standard tap. You turn them open, and hot water flows until you turn them off. They are small, robust, and often cheaper. However, they are completely passive. If you leave a manual valve open, the radiator will continue to pump out heat even if the room reaches tropical temperatures.
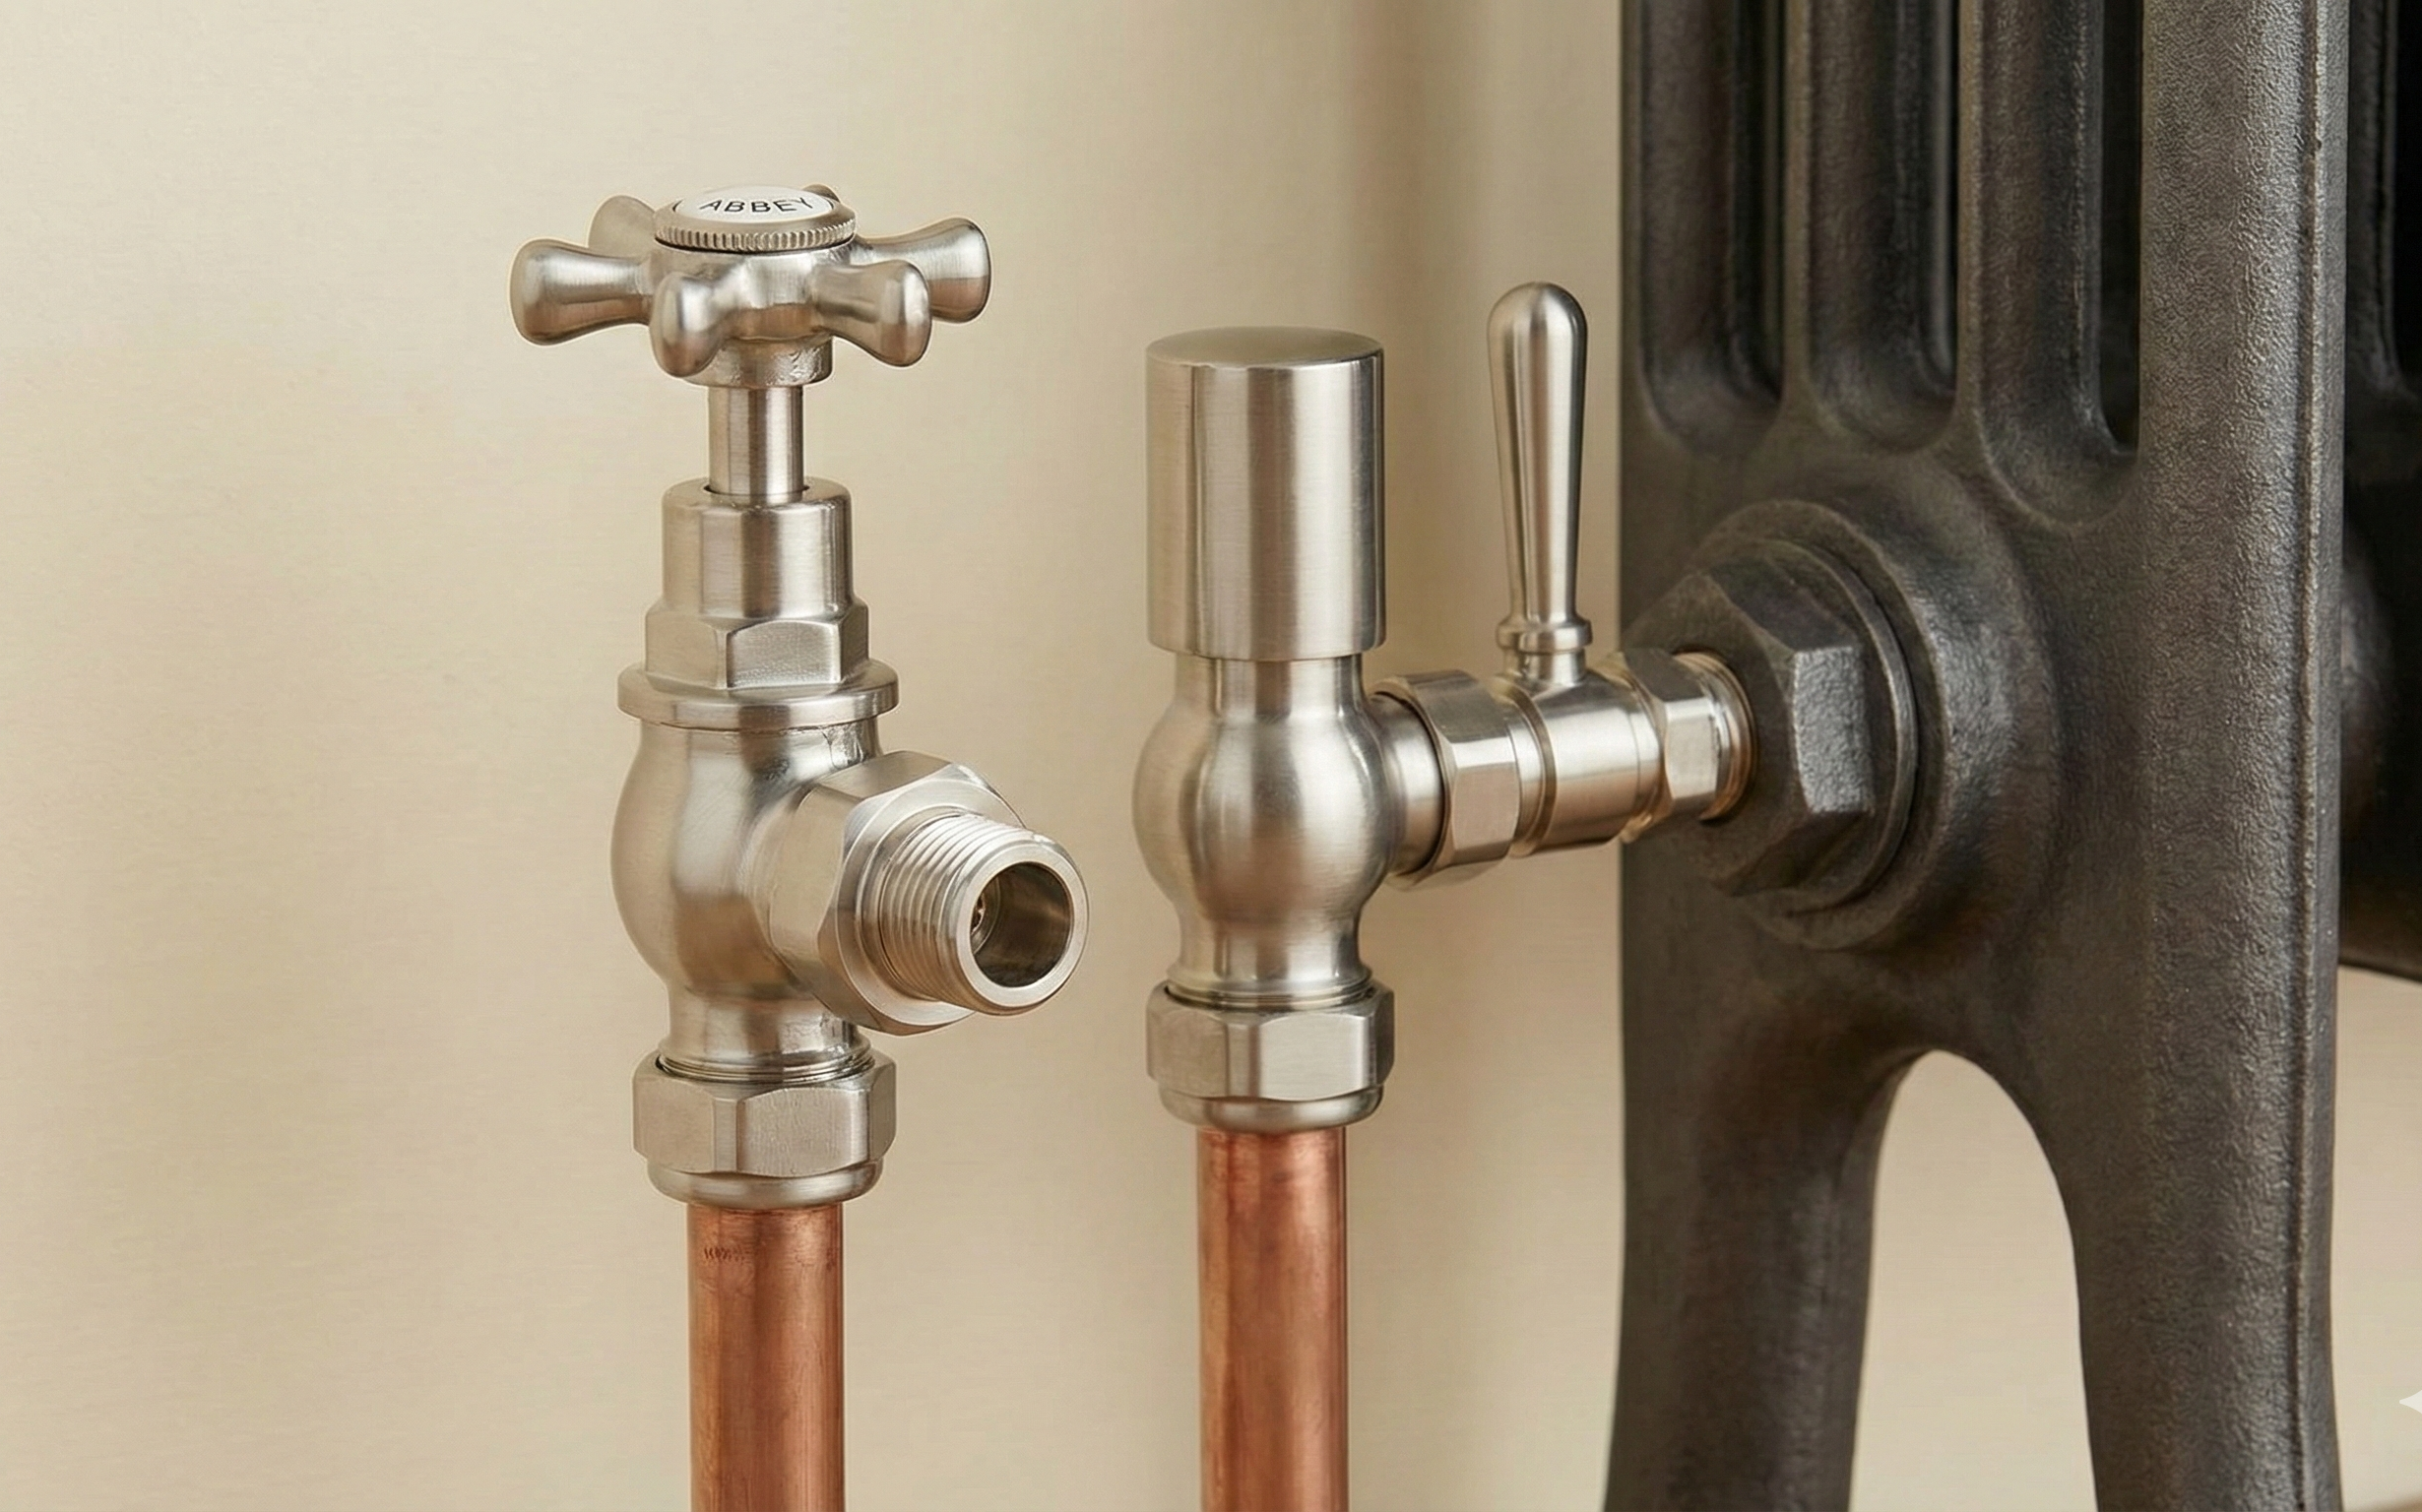
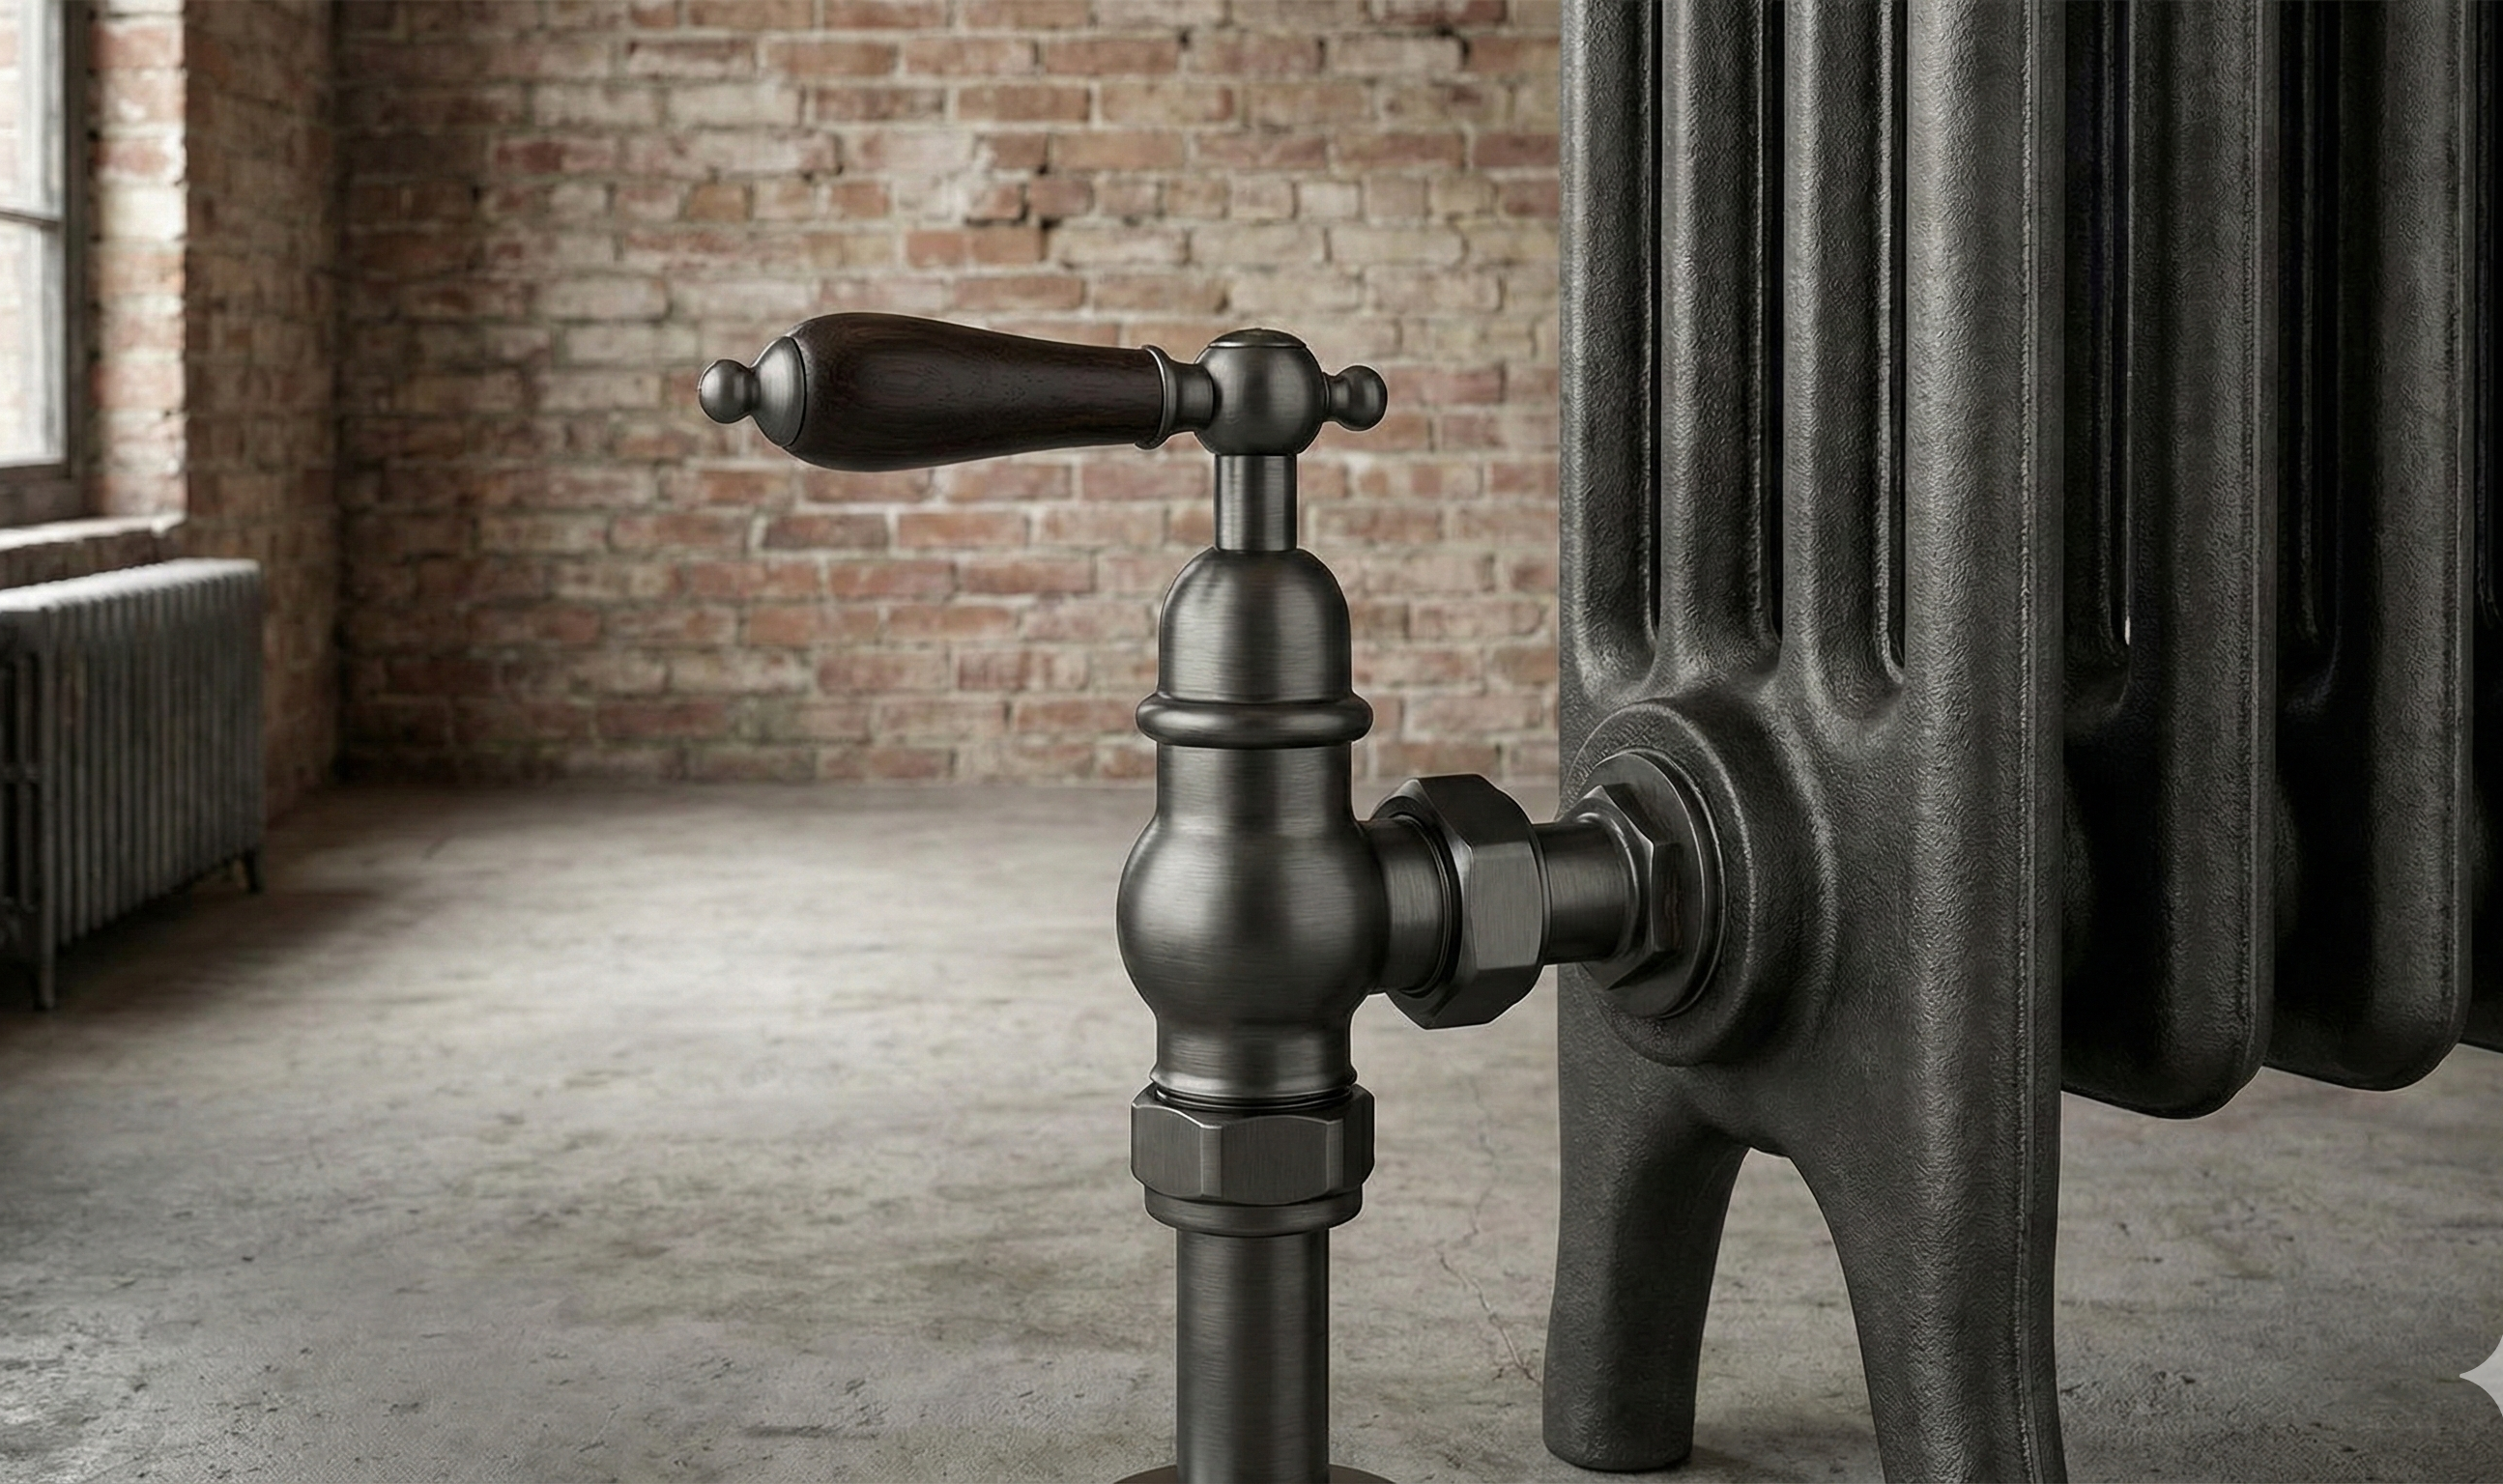
While they are simple, they are best reserved for specific areas, such as bathrooms where you always want maximum heat to dry towels, or in the room where your main wall thermostat is located (more on that later). For a touch of class, manual valves often come in "Lever" styles, which feature a real wood handle for a tactile, premium feel.
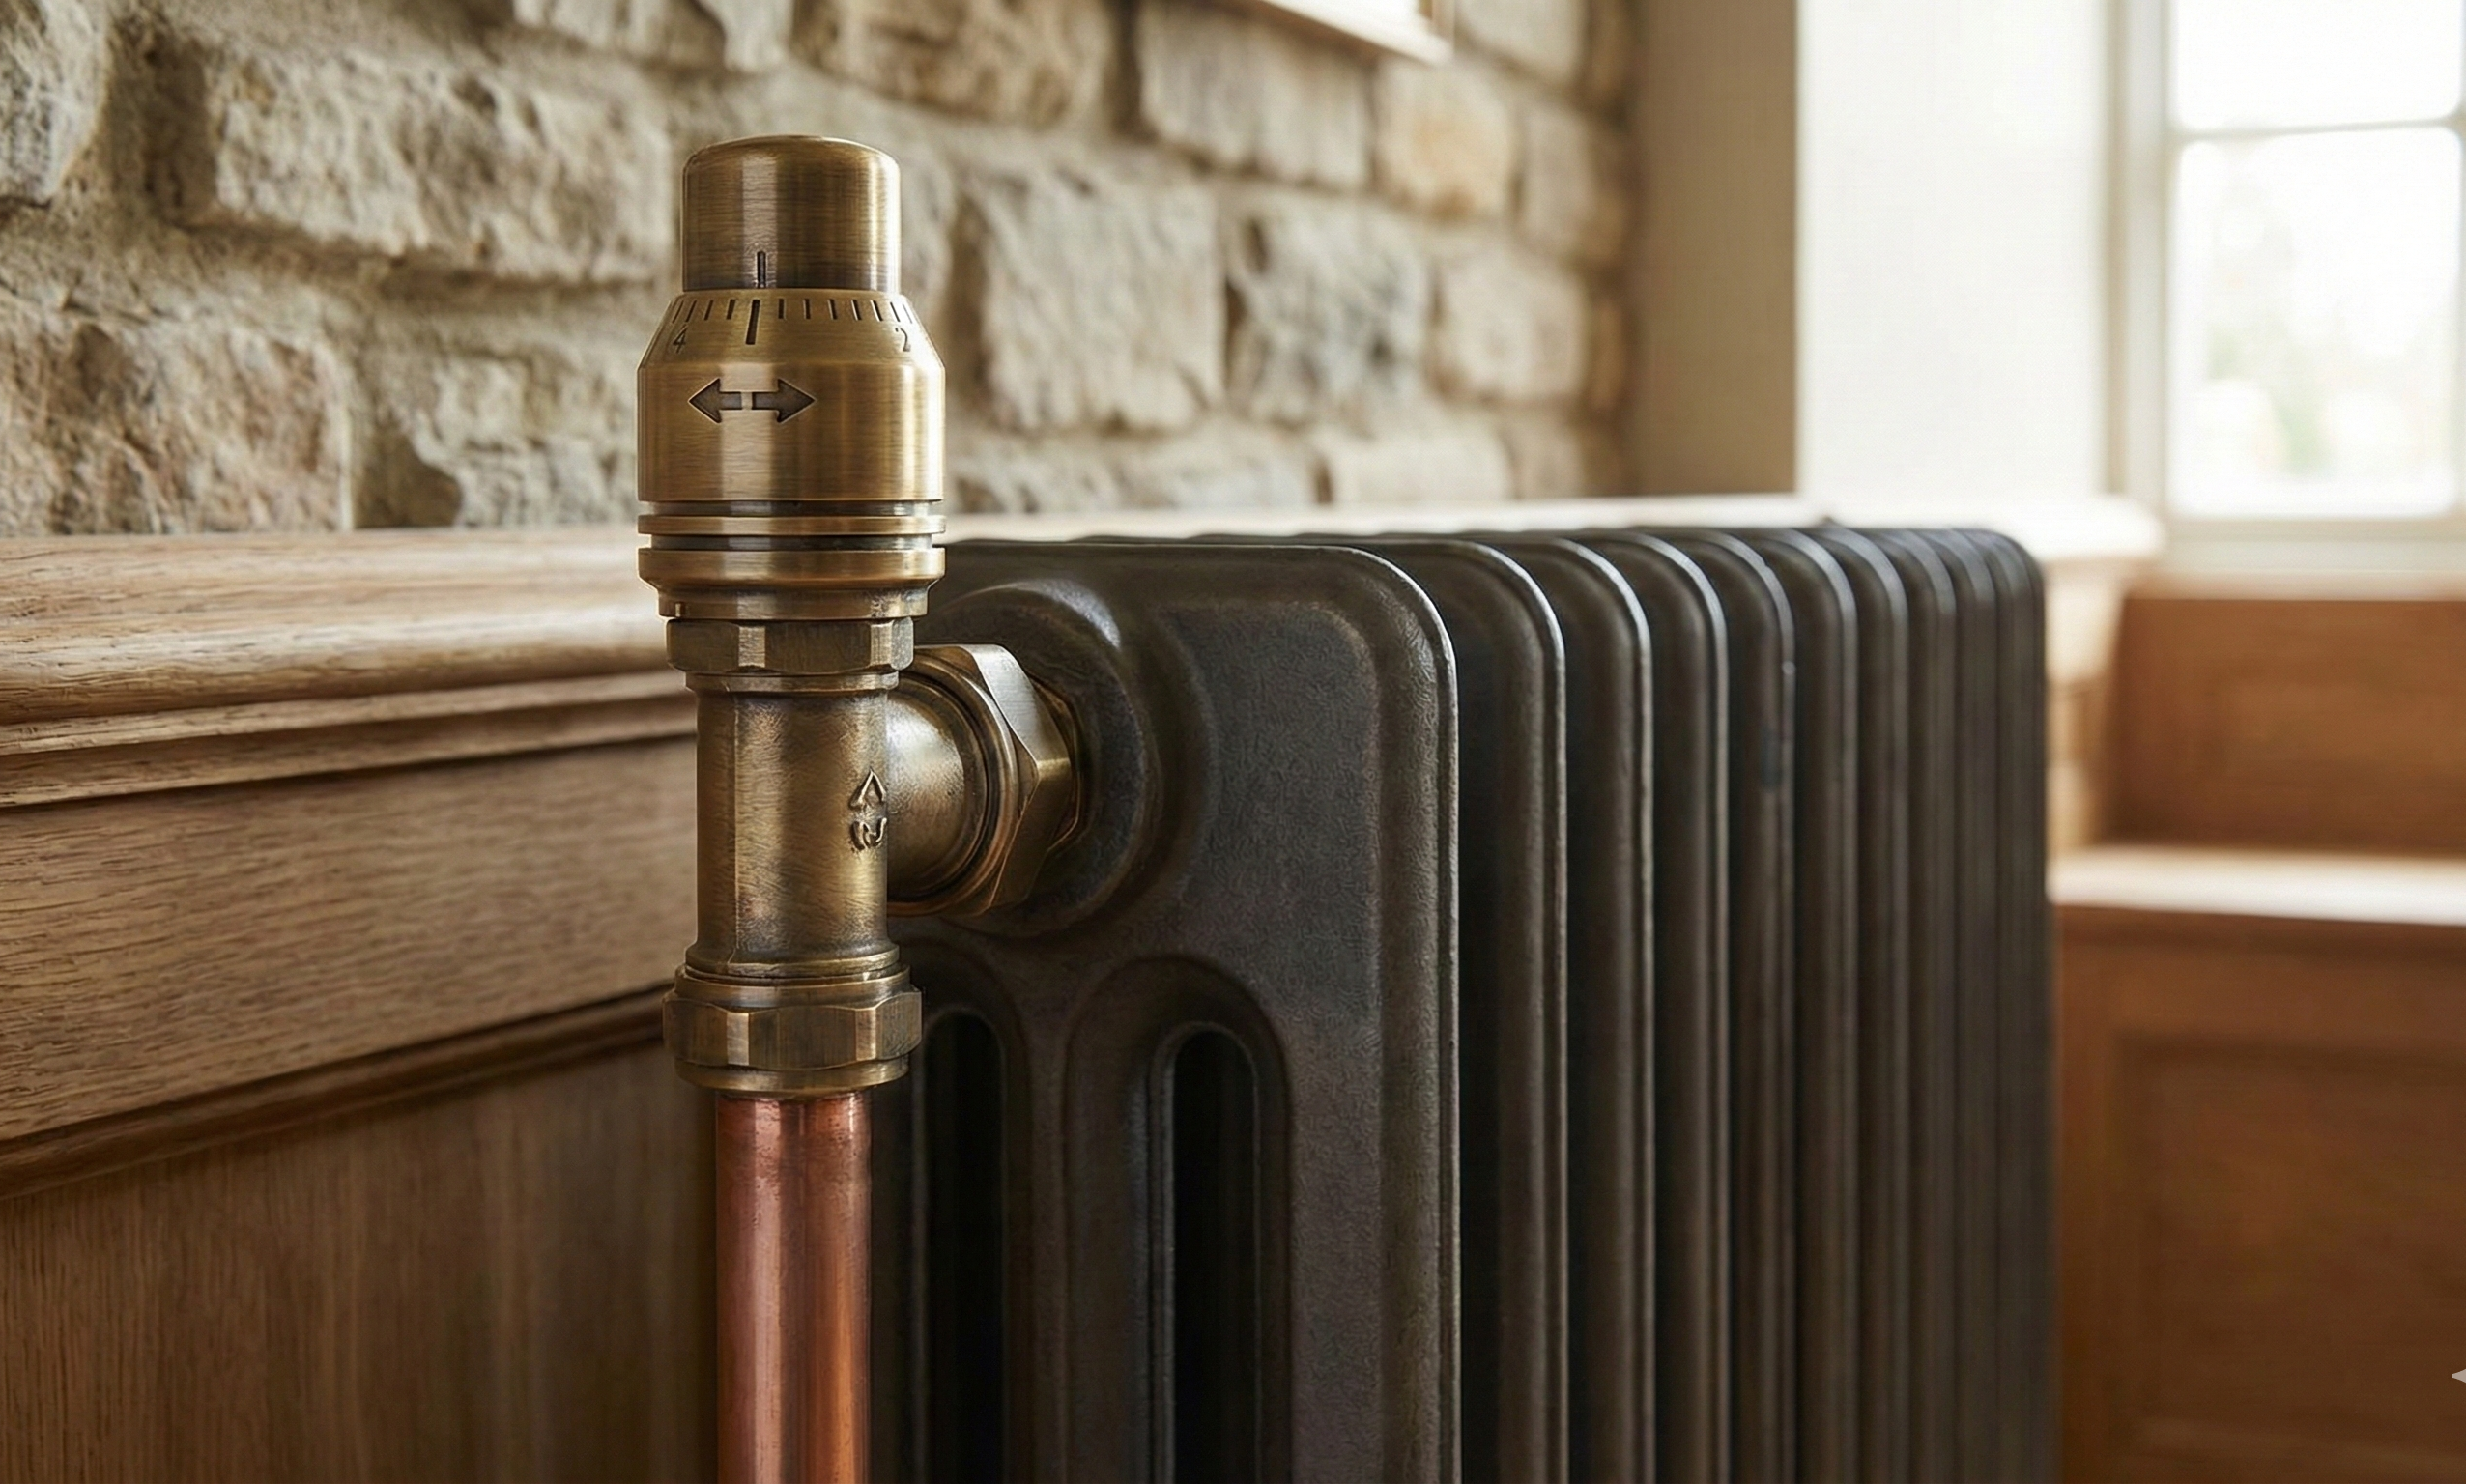
Thermostatic Radiator Valves (TRVs): The Intelligent Choice
Thermostatic Radiator Valves (TRVs) are the modern standard for energy efficiency. Inside the valve head is a sensing element (a capsule filled with wax or liquid) that expands as the room heats up. As the ambient temperature rises, the capsule expands and pushes a steel pin down into the valve body. This gradually closes the valve, restricting the flow of hot water once your desired temperature is reached.
This automatic regulation means you can set your bedroom to a cool 18°C and your living room to a cosy 21°C, and the valves will do the work for you. Research suggests that installing TRVs can save up to 18% on heating bills by preventing overheating.

The Liquid Advantage: Why It Matters
Not all TRVs are created equal. You will often see a price difference between "Wax" and "Liquid" sensors.
- Wax Sensors: Historically common and cheaper to manufacture. Wax is slow to change state, taking up to 40 minutes to react to a temperature shift. This lag causes "overshoot," where the room gets too hot before the valve shuts off, and "undershoot," where it gets too cold before it opens again.
- Liquid Sensors: The superior choice. Liquid sensors are highly responsive, reacting to temperature changes in under 20 minutes. This tighter control loop maintains a steady, comfortable environment and maximizes the efficiency of your boiler or heat pump.
Style Matters: Matching the Valve to the Vibe
Your valve choice should complement your radiator, not clash with it. A stunning cast iron radiator from the 1890s looks jarring if paired with a cheap white plastic valve. Conversely, a sleek modern vertical radiator demands a minimalist fixture.
For period properties or traditional renovations, look for Lever Valves or Crosshead designs. Finishes like "Old English Brass" or "Pewter" add a layer of authenticity. These valves often feature real wood handles or intricate detailing that turns a functional component into a design feature. The Abbey Pewter range is particularly effective at bridging the gap between industrial chic and Victorian elegance, with a hand-finished texture that ages beautifully.
Regulatory Compliance: Part L and You
If you are replacing a boiler or installing a new heating system, you need to be aware of Part L of the Building Regulations. Updated in 2022, these regulations mandate that new systems must be designed to operate at lower flow temperatures (maximum 55°C) to improve efficiency and accommodate low-carbon technologies like heat pumps.
Crucially, Part L requires that essentially all radiators in a dwelling must have thermostatic controls (TRVs). This is no longer just a "nice to have" it is a regulatory standard to ensure UK homes reduce their carbon footprint.
The "Reference Room" Exception
However, there is one vital exception to the TRV rule: the Reference Room. This is the room where your main wall thermostat is located (usually the hallway or living room). In this specific room, you should install a Manual Valve and leave it fully open.
Why? If you put a TRV in the same room as the wall thermostat, they will fight each other. If the TRV shuts off the radiator at 20°C, but the wall thermostat is set to 21°C, the boiler will keep running indefinitely, trying to heat a room that has locked itself shut. This wastes fuel and can damage the pump.
The Installation Masterclass: Balancing Your System
Buying the right valve is step one. Setting it up correctly is step two. A common complaint we hear is, "My living room is boiling, but the spare bedroom is freezing." This is rarely a fault with the radiators; it is a lack of System Balancing.
Every valve set comes with two valves: the control valve (Manual or TRV) and the Lockshield valve. The Lockshield is the smaller one covered by a plastic cap that you don't turn daily. It is the gatekeeper of your system's pressure.
- The Concept: Water is lazy. It wants to take the shortest path back to the boiler. Without balancing, hot water rushes through the radiators closest to the boiler and ignores the ones further away.
- The Fix: You need to "throttle" the flow on the hot radiators by partially closing their Lockshield valves. This restricts the flow, forcing the water to travel further down the pipework to reach the distant rooms.
- The Result: A perfectly balanced system where every radiator heats up at the same speed, giving you even warmth throughout the house.
Avoiding "Water Hammer"
Have you ever heard a loud banging or vibrating noise when your heating comes on? That is called "water hammer," and it is often caused by valves being installed the wrong way around.
Older valves were "Uni-Directional," meaning water could only flow through them one way. If you installed them on the return pipe, the water pressure would slam the valve shut, causing the vibration. Fortunately, premium modern valves, like the Admiral Traditional TRV, are Bi-Directional. This means the internal mechanism allows water to flow in either direction without rattling. It makes installation much more forgiving for DIYers who might not be 100% sure which pipe is the flow and which is the return.
Common Pitfalls: Microbore and Pipe Sizing
One final check before you buy: pipe size. The UK standard is 15mm copper pipe. However, if your home was built between the 1970s and 1990s, you might have Microbore pipework, which is 10mm or even 8mm thick.
If you buy a standard 15mm valve for a 10mm pipe, it won't fit. But don't panic you don't need to hunt for specialist "microbore valves" which are often ugly and expensive. You simply need a Reducer. This is a small metal adaptor that sits inside the valve inlet, stepping the size down to clamp tightly onto your smaller pipes. Most high-quality valve retailers will sell these reducers alongside their standard ranges, allowing you to use any designer valve on any pipe system.
Summary: Your Checklist for Success
Don't let the technical jargon put you off. You now have the knowledge to make an expert choice. Just remember the "5-Second Test":
- Check your pipes: Floor (Angled/Straight) or Wall (Corner/Angled)?
- Check your radiator: Side inlets or bottom inlets?
- Choose your control: Manual for bathrooms/thermostat rooms, Liquid TRVs for everywhere else.
- Pick your style: Match the metal finish (Antique Brass, Pewter, Satin Nickel) to your radiator or interior décor.
By following these simple steps, you ensure that your heating system isn't just a utility, but a seamless part of your home's design and efficiency. Whether you are aiming for the rustic charm of the Abbey Old English Brass range or the precision of the Admiral TRV, the right valve is the finishing touch that brings it all together.
Ready to upgrade? Don't settle for standard white plastic. Explore our full range of designer radiator valves and find the perfect match for your home today. Leave a comment below if you're still unsure about your pipework—we'd love to help you solve your heating puzzle!