How to Bleed Your Radiators – And Why It’s Important
Central heating is the unsung hero of the modern home. We rely on it implicitly to keep us comfortable through the bitter winter months, yet we rarely give it a second thought until it stops working efficiently. If you have ever walked into a room, cranked the thermostat up, and touched a radiator only to find it scorching hot at the bottom but stone cold at the top, you have encountered the single most common maintenance issue in domestic heating: trapped air.
This phenomenon, known technically as an "air lock," is more than just a minor nuisance. It represents a significant inefficiency in your home's energy consumption. When air displaces water in your heating system, your boiler works overtime, burning more gas or electricity to achieve the desired room temperature. You are essentially paying to heat pockets of air that cannot radiate warmth.
The good news is that fixing this issue does not usually require an expensive call-out fee for a plumber. "Bleeding" a radiator the process of releasing this trapped air is a fundamental DIY skill that every homeowner and tenant should possess. Whether you have a modern condensing combi boiler, an old gravity-fed system, or sleek new vertical designer radiators, the principles remain largely the same.
This comprehensive guide will take you through the entire process in forensic detail. We will explore the physics of why air collects, the specific techniques for different radiator models, how to troubleshoot when things go wrong, and how to safely repressurize your system afterward. By the end of this article, you will be able to restore your heating system to peak efficiency with confidence.
Table of Contents
- 1. When Should You Bleed a Radiator?
- 2. The Benefits of Properly Bleeding Radiators
- 3. Which Radiator Should You Bleed First?
- 4. How to Bleed a Radiator: Step-by-Step
- 5. How to Bleed a Radiator Without a Key
- 6. How to Bleed a Radiator with a Combi Boiler
- 7. How to Bleed a Vertical Radiator
- 8. How to Bleed a Heated Towel Rail
- 9. How to Bleed Old Radiators
- 10. How to Bleed Designer Radiators
- 11. How Often Should You Be Bleeding Radiators?
- 12. Troubleshooting Tips
When Should You Bleed a Radiator?
Many homeowners operate under the misconception that radiator bleeding is a monthly chore or, conversely, something you only do when the boiler breaks down. The truth lies somewhere in the middle. You should not bleed radiators blindly without cause, as doing so needlessly drops the system pressure and introduces fresh oxygenated water into the pipes (which fuels corrosion). Instead, you should learn to recognize the specific symptoms that indicate an air lock.
1. The Cold Top / Hot Bottom Syndrome
This is the definitive diagnostic sign. Understanding the physics helps here: air is significantly lighter (less dense) than water. In a central heating system, water acts as the conveyor belt for heat. When air enters the system, it naturally rises to the highest available point within any given component. Inside a panel radiator, that point is the top horizontal bar.
If you touch your radiator and the bottom is hot (indicating the flow pipe is working) but the top third is cold, the hot water is physically unable to reach the top because a bubble of air is occupying that space. The bigger the cold patch, the more air is trapped.
2. Auditory Clues: Gurgling, Banging, and Trickling
A healthy central heating system should be almost silent, perhaps emitting a gentle hum from the boiler pump. If your home sounds like a running stream, a boiling kettle, or a series of metallic clunks, you have air moving through the pipes.
- Gurgling/Trickling: This sound occurs when water is cascading over an air pocket, much like a waterfall. It usually happens inside the radiator itself.
- Banging (Kettling): This is often caused by air trapped in the boiler heat exchanger or the pump. The water boils locally, creating steam bubbles that collapse with a loud bang. This is a more serious symptom that requires immediate bleeding to prevent boiler damage.
3. The "Damp" Room Feel
Sometimes the signs are less obvious. You might have the thermostat set to 21°C, but the living room feels chilly or damp. If your radiators are full of air, their surface area is effectively reduced. A 1000W radiator might only be outputting 600W of heat if the top half is full of air. This forces the boiler to cycle on and off more frequently without ever truly warming the fabric of the building.
The Benefits of Bleeding Radiators Properly
Bleeding your radiators is not just about comfort; it is an act of home economics and system preservation. Ignoring trapped air can lead to a cascade of expensive problems down the line.
1. Lower Energy Bills and Carbon Footprint
An air-locked system is an inefficient system. Modern condensing boilers are designed to return water at a specific temperature to operate in "condensing mode" (the most efficient state). If radiators aren't dissipating heat effectively because they are half-full of air, the return water temperature remains too high, preventing the boiler from condensing. This means you are burning more gas for less heat. By bleeding the radiators, you restore the full thermal efficiency of the panel, allowing your home to heat up faster and your boiler to turn off sooner.
2. Preventing Internal Corrosion (The Silent Killer)
The "air" inside your radiator is rarely just pure air; it is often a mixture of atmospheric air and hydrogen gas. Atmospheric air contains oxygen. When oxygen meets the steel of your radiators and water, a chemical reaction occurs: oxidation (rusting). This process creates a black, sludge-like substance known as Magnetite (Iron Oxide).
Magnetite is the nemesis of central heating. It settles at the bottom of radiators (creating cold spots at the bottom), blocks narrow pipes, and destroys boiler pumps. By bleeding the air out, you are removing the oxygen source, slowing down the rust process significantly.
3. Protecting the Circulation Pump
Your boiler contains a precision-engineered water pump. These pumps use the water they circulate for lubrication and cooling. If an air lock reaches the pump, the impeller can spin in a pocket of air rather than water. This causes the pump to overheat and the bearings to grind a phenomenon called "dry running." Replacing a boiler pump can cost upwards of £300/£400, whereas bleeding the system costs nothing.
Which Radiator Should You Bleed First?
If you have multiple radiators to bleed, approaching them in a random order is inefficient. You might bleed one, only to push that air bubble into the next radiator down the line. To clear the system effectively, you must understand the flow of the loop.
The Golden Rule: Start Low and Far
Whether you have a gravity-fed system or a pressurized combi system, the general consensus for a full system bleed is to start furthest away from the heat source.
- Identify the Boiler Location: Usually in the kitchen, utility room, or loft.
- Ground Floor First: Go to the ground floor radiator that is physically furthest away from the boiler. Bleed this one first.
- Work Backwards: Move to the next furthest radiator on the ground floor, working your way closer to the boiler.
- Move Upstairs: Once the ground floor is done, go to the top floor. Again, start with the radiator furthest from the boiler.
- Finish Closest to Boiler: Your final radiator should be the one closest to the boiler (often the bathroom towel rail or a hallway radiator).
Why this order? Air naturally rises and wants to escape at the highest point. By starting low and far, you are systematically chasing the air bubbles up through the pipework toward the final collection points, ensuring you don't leave stray pockets of air behind in the lower loops.
How to Bleed a Radiator: Step-by-Step

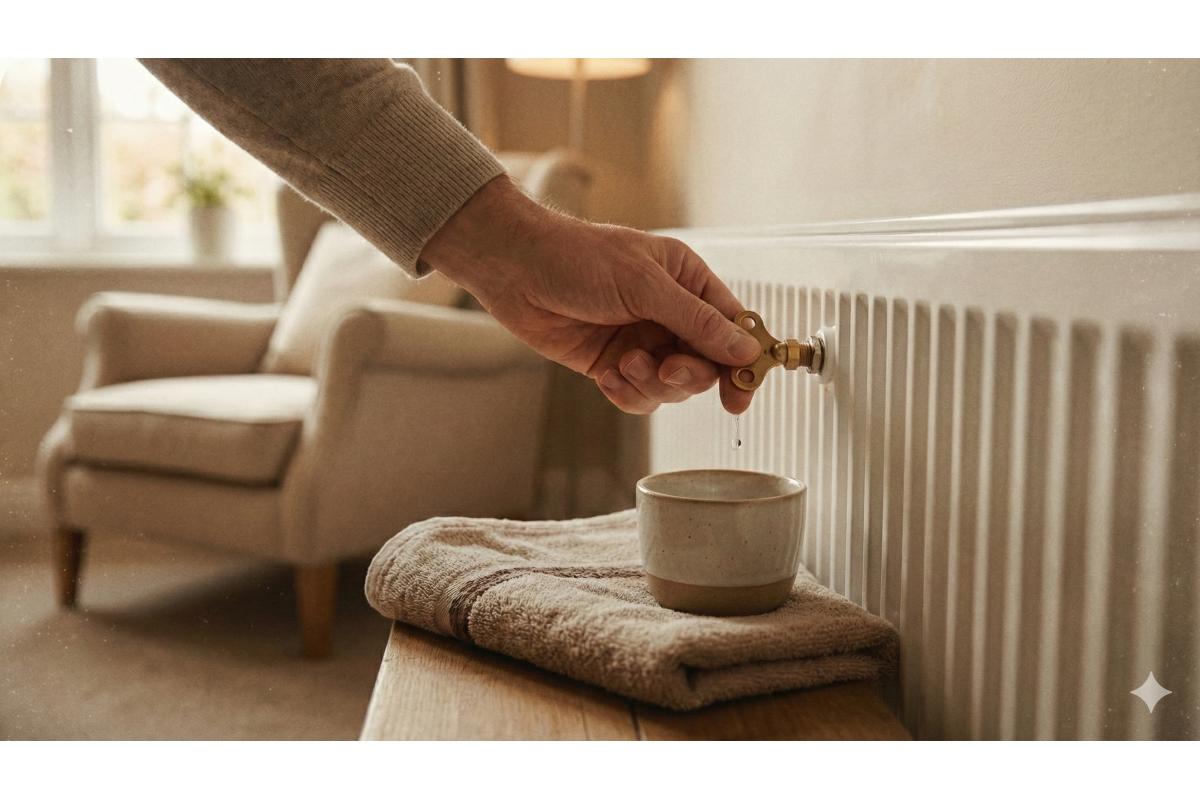
This is the core procedure for a standard steel panel radiator. While simple, precision is key to avoiding mess and damage.
Preparation: Safety First
Why?
1. Scalding Risk: The water inside a running heating system can reach 75°C to 80°C. If this sprays onto your hand, it causes instant burns.
2. Pump Suction: If the central heating pump is running, it creates pressure differentials in the pipes. Depending on where the radiator is located relative to the pump, opening the bleed valve while the pump is on might actually suck air into the radiator rather than letting it out, making the problem worse.
Action: Turn off the boiler/thermostat and wait at least 30 minutes for the water to cool down.
Tools Needed
- Radiator Key: A small brass tool with a square socket. These are standard sizes in the UK and Europe.
- A "Catch" Cloth: An old towel or rag. The water inside central heating is often dead water it is black, oily, and smells metallic due to the magnetite content. It stains carpets and curtains instantly.
- A Small Container: A yogurt pot, a mug, or a tupperware container to catch the initial spurt of water.
- Tissue Paper: For the final wipe and leak check.
The Process
- Locate the Valve: Look at the top left or top right corner of the radiator. You will see a small round metal plug with a square nub in the center. This is the bleed valve. (Note: The other side is usually a "blanking plug" with no square nub).
- Position Your Tools: Hold your old cloth against the wall behind the valve to protect the paintwork. Hold your catch container immediately under the valve spout.
- Insert the Key: Fit the square socket of the key onto the square nub of the valve. It should fit snugly. If it slips, do not force it, as you will round off the valve.
- The "Quarter Turn": Gently turn the key anti-clockwise (lefty-loosey). You do not need to unscrew it completely! Usually, a quarter-turn or half-turn is sufficient.
- Listen for the Hiss: As the valve opens, you will hear a sharp hissing sound. This is the pressurized air escaping.
- Wait for the Change: Keep the valve open. The hissing will continue for a few seconds (or up to a minute for very empty radiators). Suddenly, the sound will change from a hiss to a splutter.
- Watch for Water: As soon as the air is gone, liquid water will start to dribble or spurt out. Let a tiny amount of water escape (to ensure no trailing bubbles remain).
- Close Immediately: Turn the key clockwise (righty-tighty) to close the valve.
Important: Do not over-tighten. These are small brass threads and can snap easily. Just tighten it enough to stop the water flow. - Clean Up: Wipe the valve dry with a tissue. Check it again 10 minutes later to ensure no beads of water have formed.
How to Bleed a Radiator Without a Key
It happens to the best of us: you need to bleed a radiator on a Sunday night, but the specific brass key is missing. Can you improvise?
Scenario A: The Slotted Valve (The Easy Fix)
Take a close look at the bleed valve nub. Most modern radiators manufactured in the last 15-20 years feature a small slit cut across the square head. This is designed for a flat-head screwdriver.
- Find a flat-head screwdriver with a tip width that matches the slot.
- Insert it into the slot and turn gently anti-clockwise.
- Follow the standard bleeding procedure.
Scenario B: The Hex Valve
Some imported European radiators, towel rails, or designer models do not use the square nub system. Instead, they have an internal hexagonal hole. For these, check your toolbox for an Allen key (Hex key). The standard sizes are usually 2mm, 2.5mm, or 3mm.
Scenario C: The Pliers Method (The "Last Resort")
If you have an older radiator with a solid square nub and no screwdriver slot, you might be tempted to use pliers or a wrench.
How to Bleed a Radiator with a Combi Boiler
This section is crucial for anyone with a modern heating system. Most homes today use a "Combi" (Combination) boiler or a System boiler with an unvented cylinder. These are Sealed Systems.
Unlike older "gravity-fed" systems which had a tank of water in the loft to automatically top up water levels, a sealed system is a closed loop pressurized to between 1.0 and 1.5 bar. When you bleed air out of a radiator, you are physically removing volume from this closed loop. Consequently, the pressure will drop.
The Critical Combi Procedure
- Pre-Check: Before bleeding, look at the pressure gauge (manometer) on the front of your boiler. It should be in the green zone (usually around 1.2 to 1.5 bar). If it is already low (near 0.8 bar), top it up before you start bleeding.
- Perform the Bleed: Go around and bleed your radiators as described in the steps above.
- The Pressure Drop: Return to your boiler. You will likely see that the pressure gauge has dropped. If you removed a lot of air, the pressure might have fallen into the red zone (below 0.5 bar). If the pressure is too low, the boiler will "lock out" (shut down) as a safety measure.
- Repressurize (The Filling Loop): You must now replace the lost air volume with fresh water.
- Locate the Filling Loop. This is usually found directly underneath the boiler casing. It typically looks like a flexible silver braided hose connecting two pipes, with a small black or blue lever/tap on one or both ends.
- Open the Taps: Turn the small tap(s) slowly. You should hear the sound of water rushing into the system.
- Watch the Gauge: Keep your eyes glued to the pressure gauge. Watch the needle rise.
- Stop at 1.5 Bar: As soon as the needle hits the recommended pressure (usually 1.5 bar), close the taps firmly. Do not over-fill the system!
Note: If you accidentally over-fill the system to 3.0 bar, you may see water dripping from a copper pipe outside your house. This is the Pressure Relief Valve (PRV) doing its job to prevent the boiler from exploding. You will need to bleed a radiator specifically to drain some water out and lower the pressure back to 1.5 bar.
How to Bleed a Vertical Radiator
Vertical radiators (tall columns) have become incredibly popular in modern interior design, but they present unique bleeding challenges due to their height and internal volume.
- The Height Issue: The bleed valve on a vertical radiator is almost always located at the very top. Unless you are extremely tall, you will need a stable stepladder. Do not attempt to do this on tiptoes you need to be able to see the valve clearly to catch the water.
- Hidden Valves: For aesthetic reasons, many manufacturers hide the bleed valve on the rear of the radiator or sunken into the top cap. You might need to feel around the back of the top panel to find it.
- Slow Release: Vertical radiators hold a large volume of water in tall columns. Air bubbles can be stubborn in these designs. It may take longer for the air to fully hiss out compared to a horizontal panel. Be patient and wait for a steady stream of water.
How to Bleed a Heated Towel Rail
The bathroom heated towel rail is a notorious trap for air. Because bathrooms are often upstairs, the top of the towel rail is frequently the highest physical point in the entire central heating circuit. Air naturally migrates here.
- Cosmetic Caps: Most chrome towel rails are designed to look sleek. You might not see a bleed valve immediately. Look at the top of the two vertical upright bars. You will likely see a smooth, domed chrome cap. This is often just a cosmetic cover. Unscrew this cap to reveal the actual bleed screw underneath.
- Dual Fuel Rails: Many towel rails are "dual fuel," meaning they are connected to the central heating but also have an electric element for summer use.
Warning: Ensure the electric element is switched off and the rail is cold before bleeding. Bleeding a live electric rail creates a risk of water dripping onto live electrical components. - Balancing Issues: If you bleed a towel rail and it remains cold, it is often a balancing issue. The water prefers to take the path of least resistance through larger radiators downstairs. You may need to slightly close the lockshield valves on other radiators to force water up to the towel rail.
How to Bleed Old Radiators
If you live in a period property with cast iron radiators or steel panels from the 1970s/80s, you need to approach bleeding with extreme caution. These components are old, potentially brittle, and often seized.
1. The Paint Problem
Over 40 years, a radiator may have been painted five or six times. Often, gloss paint has flowed over the bleed valve, sealing the plug to the radiator body.
Solution: Do not just jam the key in and turn. The torque will likely snap the key or the valve head. Take a Stanley knife (box cutter) and carefully score a circle around the bleed plug, cutting through the layers of paint to break the seal. Use a small wire brush to clean paint out of the square nub so the key seats deeply.
2. The Seized Valve
If you apply moderate pressure and the valve does not move, STOP. Forcing a seized brass valve will cause it to shear off, leaving the threaded stem stuck inside the radiator hole. This is a disastrous scenario that usually requires draining the whole system and drilling out the valve.
Solution: Spray a small amount of penetrating oil (like WD-40 or GT85) onto the valve thread (try to avoid the paintwork). Leave it to soak for 30 minutes. Try again gently, working the key back and forth (tighten/loosen) to break the corrosion bond.
How to Bleed Designer Radiators
Designer radiators (Anthracite columns, abstract shapes, stainless steel finishes) require a delicate touch. The mechanics are the same, but the materials are less forgiving.
- Protect the Finish: Standard steel radiators are painted with durable enamel. Designer radiators often have matte powder coats or mirrored finishes. If your radiator key slips, it will scratch deep silver lines into your matte grey finish. Always wrap a piece of masking tape around the key shaft or hold a cloth tightly around the area to protect the surface if the key slips.
- Chemical Stains: If water dribbles onto a hot chrome radiator, it will evaporate instantly, leaving behind limescale and magnetite deposits that are very difficult to clean off without scratching the chrome. Ensure you catch every drop of water, and wipe the area down with a damp microfiber cloth immediately.
How Often Should You Be Bleeding Radiators?
This is a common question with a nuanced answer. In an ideal world, a central heating system is a sealed, airtight loop. Theoretically, once the air is out, it should stay out.
The Standard: Checking your radiators once a year (at the start of autumn) is normal maintenance. Finding a small amount of air in one or two radiators (a 2-second hiss) is acceptable.
The Warning Sign: If you find yourself bleeding radiators every few weeks, or if you have to bleed them every time you turn the heating on, you have a problem.
Fresh air cannot get into a pressurized system unless water is getting out. Frequent air accumulation usually indicates:
- A Micro-Leak: A tiny leak under a floorboard that is letting water out and sucking air in.
- Hydrogen Generation: This is critical. If the gas coming out of your radiator smells like rotten eggs, or if it is flammable (do not test this!), it is Hydrogen, not air. Hydrogen is created when the steel inside your radiator is corroding. This means your system is rusting to death. You don't need to bleed it; you need to add chemical inhibitors or flush the system immediately.
Troubleshooting Tips
Sometimes, bleeding the radiator doesn't fix the cold patch. Here is how to troubleshoot the remaining issues.
"I bled the radiator, water came out, but it is STILL cold."
If the radiator is full of water but stays cold, the water isn't flowing.
Check the Lockshield: The valve at the bottom of the radiator (opposite the thermostat) might be closed. Remove the plastic cap and use a wrench to open it anti-clockwise by a half-turn.
Check the TRV Pin: The Thermostatic Radiator Valve (the one with numbers) might be stuck. Remove the plastic head. You will see a small silver pin. Push it down it should spring back up. If it is stuck down, the valve is closed. Tap the side of the valve body gently with a wrench to shock the pin loose.
"The radiator is Hot at the Top, but Cold at the Bottom."
This is the opposite of an air lock. If the bottom is cold, it is filled with Sludge (Magnetite). Sludge is heavier than water, so it sinks. Bleeding will not fix this. You need to mechanically remove the sludge, either by taking the radiator off the wall and flushing it with a garden hose in the yard, or by hiring a professional to perform a "Powerflush" on the whole system.
"The bleed valve is weeping water after I closed it."
Sometimes a piece of grit gets stuck in the valve seat, preventing a watertight seal.
Fix: Place your cloth underneath. Quickly open the valve a quarter turn to let a burst of water flush the grit out, then close it firmly again. If it still drips, you can buy a generic "Radiator Bleed Valve Key Cap" or wrap a small amount of PTFE tape (plumber's tape) around the screw thread to seal it.
Final Expert Opinion
Bleeding radiators is the "Hello World" of DIY plumbing it is the first step every homeowner takes toward understanding their home. It is satisfying, simple, and instantly rewarding. However, remember to treat the cause, not just the symptom. A healthy heating system should be quiet and hold its pressure. If your system is constantly noisy, gassy, or losing pressure, do not just keep bleeding it. Invest in a bottle of Central Heating Inhibitor (like Sentinel X100 or Fernox F1). Pouring this additive into your system coats the internal metal, prevents hydrogen gas formation, and stops the rust that causes 90% of heating failures. A £15 bottle of inhibitor can save you a £3000 boiler replacement.