How to Measure for a column Radiator: The Complete Expert Guide (Don't Make These Mistakes)
you have decided to join the "Vertical Revolution." You are ready to swap that tired, long white panel under the window for a sleek, space-saving vertical radiator that makes your room look twice as big and adds a touch of modern architectural style. It is a fantastic choice. Vertical radiators are currently the fastest-growing trend in UK heating. However, here is the hard truth that most retailers won't tell you in the showroom: Buying a column radiator is not as simple as just measuring the empty wall space.
Vertical radiators have fundamentally different plumbing requirements, different bracket positions, and different "swing" room needs compared to traditional horizontal radiators. Every single day, homeowners across the UK have to return their beautiful new radiators paying hefty courier fees because they measured the radiator, but forgot to measure the valves, the pipe centres, or the projection.
Don't let that be you. Whether you are a DIY enthusiast or preparing the specs for your plumber, this comprehensive 2000-word guide will walk you through the exact steps to measure for a vertical radiator correctly the first time. We will cover everything from "Tapping Centres" to "Wall Stays," ensuring a stress-free installation.
The Toolkit & Preparation
Before we start measuring walls, you need the right tools. Eyeballing it or using a school ruler won't cut it when dealing with plumbing, where a variance of 5mm can cause a leak or a cross-threaded valve.
The Essential Measuring Kit:
- Steel Tape Measure: A fabric tape (like for sewing) can stretch. Use a solid steel tape for accuracy.
- Masking Tape & Pencil: You will be marking the wall. Masking tape allows you to visualize the radiator's position without ruining your paintwork.
- Spirit Level: Floors in UK homes are rarely perfectly flat. You need to measure "true" vertical and horizontal lines.
- Pipe/Stud Detector: Essential if you are drilling into plasterboard walls to find hidden timbers or pipes.
The Golden Rule of Radiator Measuring:
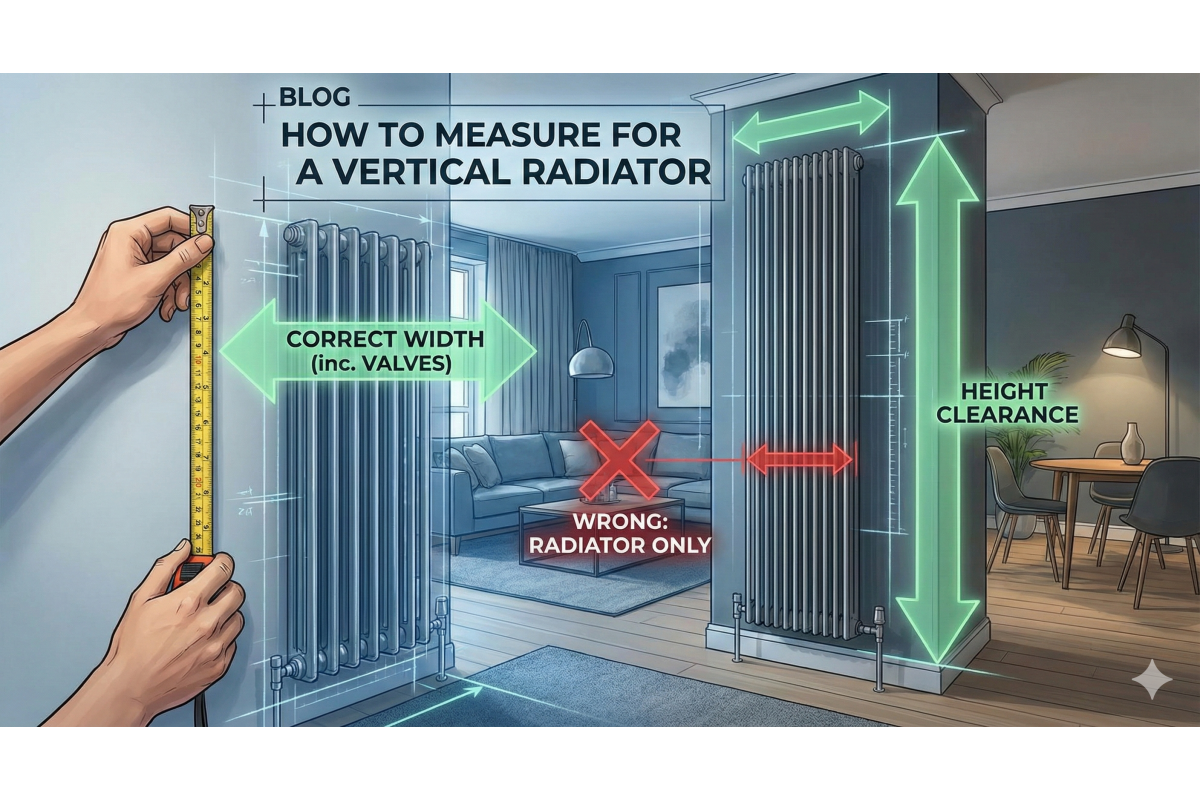
The size of the radiator is NOT the size of the installation space. You must account for the "Big Three": Valves (add width), Brackets (add depth), and Clearance (add height).
Measuring the Vertical Height (Headroom & Clearance)
Vertical radiators typically range from 1500mm to 2000mm (1.5m to 2m) tall. While you might think, "I have a 2.4m ceiling, anything fits," you need to account for air circulation and maintenance.
1. Bottom Clearance (The Floor Gap)
You generally cannot install a radiator flush with the floor. You need a gap for three reasons:
- Pipework Access: Your plumber needs space to get a spanner around the valve nuts.
- Cleaning: You need to be able to vacuum or mop underneath it.
- Convection Efficiency: Radiators work by drawing cold air from the floor, heating it, and blasting it out the top. If there is no gap at the bottom, this "chimney effect" is stifled, reducing heat output.
Recommendation: Leave at least 150mm (6 inches) from the floor to the bottom of the radiator.
2. Top Clearance (The Ceiling Gap)
If you are placing a tall radiator in a room with standard ceilings, check the top clearance. You need space for the hot air to escape without getting trapped in a pocket against the ceiling (which can cause plaster to crack over time).
Recommendation: Leave at least 50mm clearance at the top. If the radiator needs to be lifted onto brackets (hook-on style), you may need 100mm of lifting space.
Measuring the Width (The "Valve Factor")
This is where 80% of mistakes happen. If your available wall space is exactly 500mm wide, you cannot buy a 500mm wide radiator. It simply won't fit.
Understanding Valve Positioning
Unlike old panel radiators where pipes might come in from the back, most modern vertical radiators have "Bottom Opposite End" (BOE) connections. This means the holes for the valves are on the bottom left and bottom right corners, facing outwards or downwards.
You must add the width of the valves to the width of the radiator to get the "Total Installed Width."
- Standard Radiator Valves: Typically add 80mm to 100mm to the total width (approx 40-50mm per side).
- Thermostatic (TRV) Heads: These are bulkier than manual valves. If the TRV head sticks out sideways, it can add even more width.
The Calculation Formula:
To find the maximum radiator size for your space, use this formula:
Total Wall Space - 150mm (Valve Allowance & Wiggle Room) = Maximum Radiator Width
Example: You have a 600mm gap between a door frame and a wall.
600mm - 150mm = 450mm.
You should buy a radiator no wider than 450mm.
Pipe Centres (The Technical Math)
If you are renovating a room and lifting floorboards, this is easy—your plumber will run new pipes to fit your new radiator. But if you are trying to use existing pipes, or if you are burying pipes in concrete, you need precise measurements.
What are "Pipe Centres"?
"Pipe Centres" refers to the exact distance between the centre of the left pipe and the centre of the right pipe as they stick out of the floor or wall.
Scenario A: The "underside" connections (Underneath)
Some vertical radiators have central connections underneath (middle bottom).
Measurement: Usually 50mm apart.
Benefit: This keeps the valves tucked underneath the radiator, meaning the radiator width is roughly the same as the installed width. This is great for tight spaces.
Scenario B: The "side" connections (The Standard)
Most vertical columns have connections on the sides at the bottom.
- Formula: Radiator Width + Valve Allowance = Pipe Centres.
- Example: A 300mm wide radiator + roughly 90mm for valves = Pipes should be 390mm apart.
Crucial Note on "Tapping Centres":
Check the technical drawing of your chosen radiator. "Tapping centres" is the distance between the thread holes on the radiator itself. "Pipe centres" is the distance between the pipes in your floor. They are rarely the same number unless you use straight valves.
Projection (Depth & Door Swings)
"Projection" is how far the radiator sticks out into the room once mounted. This is critical in hallways, behind doors, or in narrow galley kitchens.
1. Wall to Front Face
This is the total depth. It is calculated as:
Clearance (Wall to back of radiator) + Radiator Thickness.
Vertical designer radiators often sit further off the wall than standard panels because their brackets are larger to support the weight.
2. The "Door Swing" Test
If you are installing the radiator behind a door (a very popular space-saving tactic), you must ensure the door handle won't smash into the radiator.
- Open the door to where you want it to stop.
- Measure the gap between the face of the door and the wall.
- If this gap is 120mm, look for a radiator with a projection of less than 100mm to be safe.
- Pro Tip: Always install a door stop on the floor to physically prevent the door from hitting the radiator.
Choosing the Right Valves (It Affects Measurement)
Believe it or not, the type of valve you choose changes your measurements. Understanding the three main types is vital.
1. Angled Valves (Most Common)
Used when pipes come out of the floor and connect to the side of the radiator. These add width to the installation.
2. Corner Valves (The Neatest Choice)
Used when pipes come out of the wall. Instead of the valve head sticking out into the room (where you might bang your shin on it), corner valves turn the head to sit parallel with the radiator. This reduces the "perceived" depth and looks much neater for vertical installs.
3. Straight Valves
Used when pipes run along the floor (surface mounted). These connect the pipe directly up into the radiator.
Assessing Wall Strength (Safety First)
Vertical radiators are heavy. A tall steel column radiator full of water can weigh upwards of 50kg. You cannot simply hang this on plasterboard with standard rawl plugs.
Solid Masonry Walls (Brick/Block)
These are ideal. You can drill almost anywhere. Just ensure you use heavy-duty wall plugs suitable for masonry.
Stud Walls (Plasterboard/Drywall)
This requires careful measuring. You cannot hang a heavy vertical radiator on hollow plasterboard.
- Use a stud detector to find the vertical wooden timbers inside the wall.
- Measure the distance between these studs (usually 400mm or 600mm centres).
- Check if the radiator brackets align with these studs. If they don't, you have two options:
- Option A: Open the wall and reinforce it with a timber "noggins" (cross brace).
- Option B: Buy a radiator with "slip brackets" that can be moved horizontally to align with your studs.
- Option C: Switch to an Aluminium Vertical Radiator. Aluminium is significantly lighter than steel and puts less stress on the wall.
Common Mistakes to Avoid (The Checklist)
| The Mistake | The Consequence | The Fix |
|---|---|---|
| Measuring strictly wall-to-wall | Radiator fits, but valves don't. | Subtract 150mm from wall space for valve width. |
| Forgetting the skirting board | Radiator hits skirting, won't sit flush. | Measure height from above the skirting, not the floor. |
| Assuming existing pipes will fit | Pipes are too wide/narrow. Costly plumber bill. | Assume pipes must move. Budget for pipe alteration. |
| Ignoring skirting projection | Radiator pipes foul the skirting. | Ensure "Wall to Pipe Centre" > Skirting depth. |
Frequently Asked Questions (FAQ)
Q: Can I mount a vertical radiator horizontally?
A: Generally, no. Vertical radiators have internal baffles (diverters) designed to force water up to the top. If you lay it sideways, the water will flow straight across the bottom, leaving the top cold. Always buy a radiator designed for the orientation you need.
Q: How do I measure for a curved bay window?
A: Vertical radiators are great for the flat wall sections next to a bay window, but they cannot bend. For the curve itself, you need a specialist curved radiator. Don't try to force a flat vertical panel into a curved space the brackets will fail.
Q: Do I need to measure BTU (Heat Output)?
A: Yes! Size isn't everything. A tall skinny radiator might fit perfectly but might not heat a large room. Always use our BTU Calculator. If the radiator you want doesn't have enough BTU, consider a "Double Panel" version. It has the same height and width measurements but is deeper (more projection) and provides almost double the heat.
Conclusion: Measure Twice, Order Once
Upgrading to a vertical radiator is one of the most impactful changes you can make to your home's interior. It modernises the space, frees up room for furniture, and can even improve heating efficiency.
However, success lies in the preparation. By taking the time to measure not just the wall, but the valve allowance, the pipe centres, and the projection depth, you ensure a smooth installation day. Remember: it is much cheaper to spend 10 minutes measuring correctly now than to spend £50 returning a radiator that doesn't fit.
Ready to find your perfect fit?
Now that you have your measurements, browse our collection of column Radiator. Filter by width, height, and BTU to find the exact match for your home. Still unsure? Contact our technical team with your measurements and a photo of your wall, and we will do the checking for you.